Growing up, those afternoons in the kitchen were all about sneaking bites of peanut butter straight from the jar—messy, sticky, and totally satisfying. Now I’ve taken that nostalgic flavor and turned it into a no-bake bar that’s just as comforting but way easier to pull together when the craving hits. No oven, no fuss, just creamy peanut butter and chocolate magic layered into something that’s hard to resist.
These bars are my go-to for when I want a quick treat that feels indulgent but doesn’t require much effort. The best part? They come together in minutes, which means I can satisfy that sweet tooth without breaking a sweat. Plus, they’re perfect for sharing—or not sharing, if you’re feeling sneaky. Honestly, they’ve become my little kitchen secret for busy days and lazy weekends alike.
This recipe is inspired by my childhood afternoons spent sneaking into the kitchen to steal peanut butter snacks, but I’ve turned it into a no-bake, foolproof treat that’s perfect for those days when you want something sweet without the fuss of turning on the oven.
A childhood treat reimagined
- I remember the first time I made these and how the smell of melted peanut butter filled the kitchen, instantly comforting.
- There’s a quiet pride in pulling together something so rich and satisfying, no oven required, just a bit of stirring and patience.
- Sometimes I sneak a piece straight from the fridge late at night, feeling a little rebellious and craving that firm, fudgy texture.
- These bars remind me of lazy afternoons spent with friends, sharing sweet bites and laughing over silly kitchen mishaps.
- Every time I make them, I feel a rush of nostalgia — like a little piece of childhood tucked into a modern, no-fuss treat.
A childhood treat reimagined
Making these bars always takes me back to lazy weekend afternoons in my childhood, when my mom would keep a jar of peanut butter on the counter just for me. I’d sneak into the kitchen, sticky hands and all, and dive in with a spoon. When I finally decided to turn that messy, joyful habit into something more structured, I realized how much I loved the idea of a sweet, salty bite that’s easy to whip up without turning on the oven. It’s sort of my way of capturing that carefree, sticky-fingered moment and making it a treat I can enjoy anytime.
Contextual origin, trivia, or history
- These bars originated in the mid-20th century as an easy, no-bake treat for busy families craving something sweet and satisfying.
- The combination of peanut butter and chocolate became popular during the 1960s, partly due to the rise of convenience snacks and baking shortcuts.
- Originally, recipes called for graham cracker crumbs or crushed cookies for added texture, which many home cooks adapted over the years.
- In some regions, similar no-bake bars are known by different names, like ‘Peanut Butter Slice’ or ‘Fudge Bars,’ showing their universal appeal.
- Quirky kitchen lore suggests that these bars gained popularity because they could be made with pantry staples, making them a go-to for last-minute desserts.
Ingredient breakdown: key components
- Creamy peanut butter: I love using natural, unsweetened peanut butter for a richer flavor, but smooth peanut butter works just fine for a silkier texture—just watch out for the oil separation, and stir well before measuring.
- Honey or maple syrup: I prefer honey for its deep, floral sweetness that complements the peanut butter, but maple syrup adds a subtle smoky note—adjust the amount if you prefer a less sticky bar.
- Oats: Quick oats are my go-to—they mix easily and give a nice chew. If you want more texture, switch to old-fashioned oats, but you might need to chop them a bit.
- Chocolate chips: Semisweet or dark chocolate chips melt into gooey pockets—use good quality ones for a richer chocolate flavor. For a dairy-free version, try cocoa nibs or vegan chips.
- Butter or coconut oil: I opt for unsalted butter for richness, but coconut oil makes the bars dairy-free and adds a subtle coconut aroma—melt it gently to keep the mixture smooth.
- Vanilla extract: Just a splash enhances everything with a warm, cozy aroma—skip if you’re out, but it really rounds out the flavor.
- Sea salt: A pinch elevates the sweetness and brings all the flavors together—don’t skip, even if you’re used to sweet treats without salt.
Spotlight on key ingredients
Peanut Butter:
- Creamy peanut butter: I love using natural, unsweetened peanut butter for a richer flavor, but smooth peanut butter works just fine for a silkier texture—just watch out for the oil separation, and stir well before measuring.
- Honey or maple syrup: I prefer honey for its deep, floral sweetness that complements the peanut butter, but maple syrup adds a subtle smoky note—adjust the amount if you prefer a less sticky bar.
Chocolate:
- Chocolate chips: Semisweet or dark chocolate chips melt into gooey pockets—use good quality ones for a richer chocolate flavor. For a dairy-free version, try cocoa nibs or vegan chips.
- Coconut oil: Melts smoothly, giving the chocolate a shiny finish and helping it set quickly. If you prefer a subtler coconut aroma, use less or skip altogether.
Notes for ingredient swaps
- Dairy-Free: Use coconut or almond butter instead of peanut butter for a nutty flavor without dairy, but expect a slightly different texture and richness.
- Sweetener: Swap honey for agave syrup or brown rice syrup—these will change the flavor profile slightly and may alter the stickiness a bit.
- Oats: Replace quick oats with old-fashioned oats, which will give a heartier chew; just chop them finely if large.
- Chocolate: Use vegan chocolate chips or chopped dark chocolate for dairy-free options, keeping that rich, gooey melt with a different cocoa intensity.
- Coconut Oil: Swap butter for coconut oil to keep the bars dairy-free and add a subtle coconut aroma—melt gently to maintain smoothness.
- Sweetness: Adjust honey or syrup based on your taste; less makes a milder, less sticky bar, more makes it extra fudgy.
- Salt: Add a pinch more sea salt or flaky salt for enhanced flavor contrast or skip if you prefer a sweeter, less salty treat.
Equipment & Tools
- Baking pan: Holds the mixture and shapes the bars.
- Spatula: Spreads and presses the mixture evenly into the pan.
- Microwave-safe bowl: Melts the peanut butter, honey, and chocolate efficiently.
- Parchment paper: Prevents sticking and makes lifting the bars easier.
- Knife: Cuts the set bars into squares or rectangles.
Step-by-step guide to no-bake bars
- Gather your equipment: a 20x20cm (8×8 inch) baking pan, a spatula, a microwave-safe bowl, and parchment paper. Line the pan with parchment for easy removal.
- In a microwave-safe bowl, combine 1 cup (250g) of peanut butter and 1/2 cup (120ml) honey or maple syrup. Microwave in 20-second bursts, stirring in between, until smooth and oozy—about 1 minute total.
- Add 2 cups (150g) of quick oats, 1 teaspoon vanilla extract, and a pinch of sea salt to the melted peanut butter mixture. Stir until evenly coated and the oats are slightly softened.
- Transfer the mixture to your prepared pan. Use a spatula or the back of a spoon to press it evenly into the pan, creating a compact, smooth layer. Chill in the fridge for 15 minutes to set.
- Meanwhile, melt 3/4 cup (135g) of chocolate chips with 1 teaspoon coconut oil in the microwave, in 15-second bursts, stirring until glossy and smooth (about 30 seconds).
- Pour the melted chocolate over the chilled peanut butter layer. Use a spatula to spread it into an even top. For a decorative touch, drizzle extra chocolate or sprinkle sea salt.
- Return the pan to the fridge for at least 30 minutes, or until the chocolate is firm and the bars are set. If rushed, a quick 10-minute chill in the freezer helps.
- Once fully set, lift the entire slab out of the pan using the parchment edges. Place on a cutting board and cut into squares or bars with a sharp knife.
- Serve immediately or store. For best texture, keep in an airtight container in the fridge for up to a week. The bars will firm up further and the flavors meld over time.
Chill the bars until fully firm, then cut and serve. Keep refrigerated in an airtight container for up to a week, or freeze for longer storage. Bring to room temperature for a softer bite if refrigerated.
How to Know It’s Done
- Chocolate layer is glossy and firm to the touch.
- Bars hold together when cut without crumbling.
- Peanut butter layer feels firm but tender when pressed.
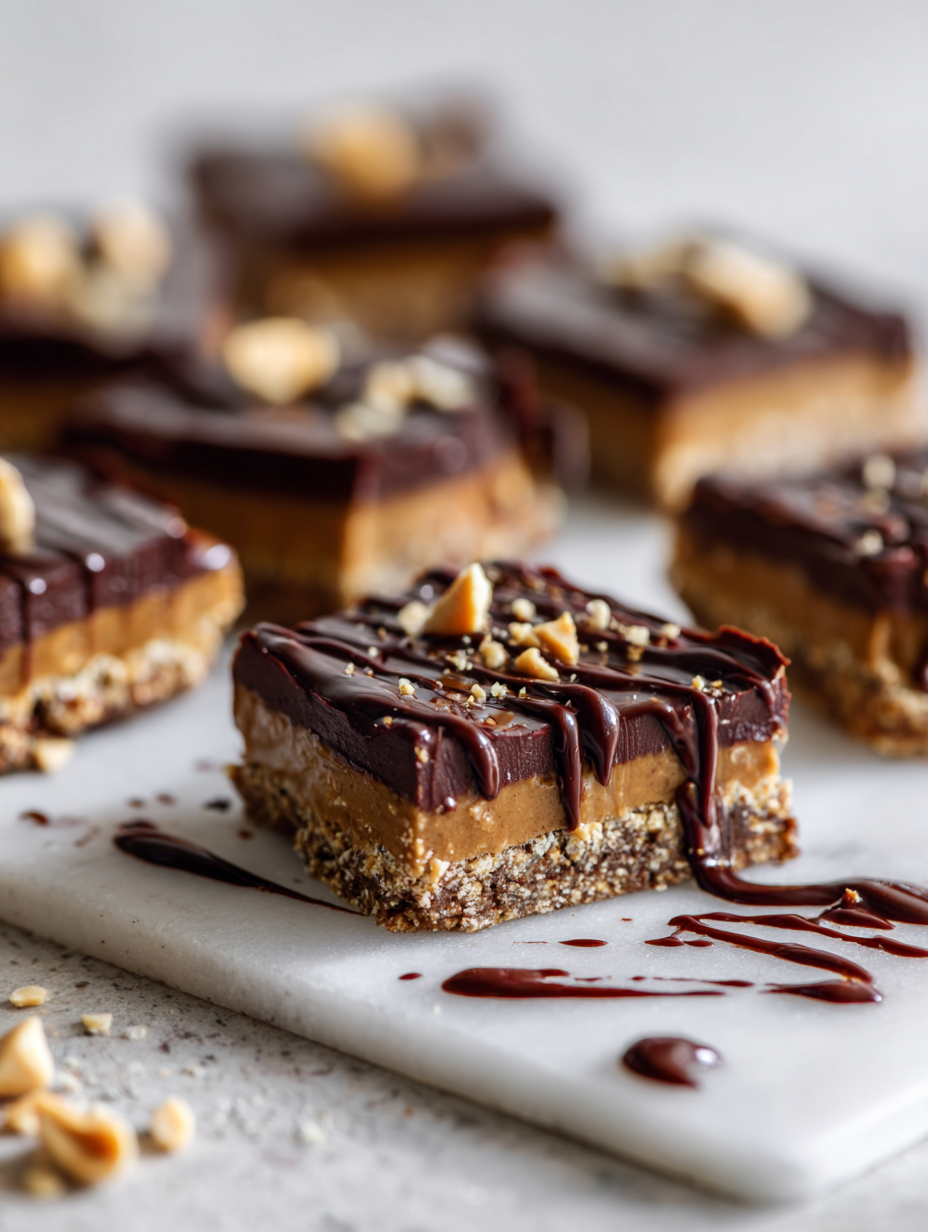
No-Bake Peanut Butter Chocolate Bars
Ingredients
Equipment
Method
- Line a baking pan with parchment paper to prevent sticking and set aside.
- Combine peanut butter and honey in a microwave-safe bowl and microwave in 20-second bursts, stirring each time, until smooth, melted, and fragrant—about 1 minute total.
- Add the quick oats, vanilla extract, and sea salt to the melted mixture and stir until everything is well combined and the oats are coated.
- Transfer the oat mixture into the prepared pan and press it down firmly with the back of a spatula to create an even, compact layer. Chill in the fridge for 15 minutes to set.
- Meanwhile, combine chocolate chips and coconut oil in the microwave and melt in short bursts, stirring until smooth and glossy—about 30 seconds.
- Pour the melted chocolate over the chilled oat layer, spreading it evenly with a spatula for a glossy, smooth top.
- Return the pan to the fridge and chill for at least 30 minutes until the chocolate is firm and the bars are set.
- Lift the whole slab out of the pan using the parchment paper and place on a cutting board. Use a sharp knife to cut into 12 squares or rectangles.
- Serve immediately or store in an airtight container in the fridge for up to a week for the best fudgy texture and flavor.
Tips & tricks for perfect bars
- Chill for firmness: Refrigerate the mixture at least 15 minutes before pressing into the pan for cleaner cuts and better texture.
- Layer evenly: Use the back of a spatula to press the peanut butter mixture flat—this prevents air pockets and ensures uniform bars.
- Chocolate melt: Melt chocolate in short bursts, stirring frequently—glossy, smooth chocolate prevents a dull, grainy finish.
- Avoid over-mixing: Mix just until ingredients are combined—overworking can make the bars dense and tough.
- Use parchment: Line your pan with parchment for easy removal and clean cuts, especially when the mixture is sticky.
- Temperature check: When pressing the mixture, it should feel cool but pliable—if it’s too warm, it might be too soft to set properly.
- Chill for success: Let the bars chill until fully firm, around 30 minutes, to prevent cracking when cutting and to enhance flavor melding.
Common mistakes and how to fix them
- FORGOT to adjust for oil separation → Stir peanut butter well before measuring.
- DUMPED in all ingredients at once → Mix oats and salt gradually for even distribution.
- OVER-TORCHED chocolate → Melt chocolate gently in short bursts, watch for glossy finish.
- MISSED chilling time → Chill until bars are firm, not just slightly set for clean cuts.
Quick fixes and pantry swaps
- If chocolate shimmers, splash a bit more coconut oil for shine and smoothness.
- When bars crack, patch with a dab of melted chocolate for a seamless look.
- Splash a tiny pinch of salt when mixture seems dull to boost flavor depth.
- Patch stuck or crumbly edges by gently pressing with a damp spatula.
- Shield melting chocolate from overcooking by melting in short bursts, stirring frequently.
Prep, store, and reheat tips
- Prepare the peanut butter mixture and press into the pan up to 24 hours ahead; keep covered in the fridge for freshness.
- Chocolate topping can be melted and poured over the base a day in advance; refrigerate until ready to set for at least 2 hours.
- Bars are best stored in an airtight container in the fridge for up to a week, maintaining their firm, fudgy texture and rich flavor.
- Reheat slightly by letting the bars sit at room temperature for 10 minutes or warming briefly in the microwave for a softer bite—smell the warm, nutty aroma.
FAQs about No-Bake Peanut Butter Bars
1. Can I use natural peanut butter?
Use natural peanut butter for a richer, oozing texture, but smooth works if you prefer a creamier bite.
2. Can I swap the honey?
Yes, you can substitute honey with maple syrup or agave for a different sweetness profile, but expect slight texture changes.
3. Can I use regular oats?
Quick oats are easiest, but old-fashioned oats work too—just chop them finely if large for better mixing.
4. Are dairy-free chocolates okay?
Vegan chocolate chips or chopped dark chocolate are great dairy-free options that melt into a gooey, rich topping.
5. Can I use butter instead of coconut oil?
Coconut oil melts smoothly and adds a subtle coconut aroma, but butter makes the bars richer and more traditional.
6. How much sweetener should I add?
Adjust the amount of sweetener based on your taste—less for milder, more for fudgier bars.
7. Should I add salt?
Adding a pinch of sea salt enhances sweetness and brings out the peanut butter’s flavor; skip if you prefer less salty.
8. How long should I chill the bars?
Chill the bars in the fridge for at least 30 minutes until firm, which helps them cut cleanly and set properly.
9. How should I store the bars?
Store leftovers in an airtight container in the fridge for up to a week; they firm up further but stay fudgy.
10. How can I reheat or soften the bars?
To soften refrigerated bars, let them sit at room temperature for 10 minutes or microwave briefly until warm and fragrant.
These no-bake peanut butter bars are more than just a quick treat; they’re a reminder that simple ingredients can create something deeply satisfying. They’ve become my go-to when I want a little sweetness without the fuss, especially during busy weeks or lazy weekends. Honestly, there’s something about the creamy peanut butter and glossy chocolate that just hits the spot, no oven required.
Sharing these bars feels like passing on a piece of comfort—nostalgic, rich, and a little rebellious. Once you’ve got the technique down, they come together fast, making them perfect for last-minute cravings or unexpected guests. In the end, they’re a small, sweet reminder that sometimes, the simplest recipes are the most memorable.

Hi, I’m Theo Granger, the voice and recipe creator behind Boldly Overseasoning.
If you believe salt is not the enemy, spices should be generous, and flavor should never whisper when it can sing, then you are absolutely in the right place. Boldly Overseasoning is my unapologetic celebration of big flavor, confident cooking, and trusting your instincts in the kitchen. I created this space for people who are done with bland food and ready to cook with courage.


Leave a Reply